Friday, August 12, 2011

Miraculous Mosquito Art Prints...Coming Soon!

Today I decided to hop down to the printers and order a few A4 sized examples of my artwork on different thicknesses of silky smooth paper - 'Earthed', 'Illuminated M', and 'Chinese Proverb'. I was really pleased with the result, and thinking of selling these in my shop.

Update:  You can now purchase this print here.
Next job will be to visit good ol' New Zealand Post and find out how much they will cost to send to different international locations.  It's very exciting to see my artwork printed out so nicely.  Can't wait until I can list them properly in my shop and start sending them worldwide!

I might have a go at making some cards and other stationary as well...I think the print shop will be seeing a lot more of me in the future.

Comments?  Suggestions?  I would love to hear what you think :)

Regards,
MM.

Tuesday, August 9, 2011

Mystery Drawing Makeover

First 'Mystery Drawing' Clue - Before.

First 'Mystery Drawing' Clue - After.
 The other day we did a bit of a cleanup around the house, and out popped an old drawing I had done about a year ago, using coloured pencil on good quality cartridge paper.  It was half finished, and I remember feeling a bit bored with it and that is why I hadn't gone any further.  It's amazing what a bit of time can do, though, and I felt motivated to bring it back to life.  It is quite a detailed one, with many different sections and scenes, and it will take me a while to do, so I thought it might be fun to turn it into a 'Mystery Drawing' series.  In other words, instead of waiting until it is finished and then posting it for you to see (who knows how long it will take??), I thought I would make things more interesting and only post small sections at a time, showing the before and after.  The way I am reworking it is to scan it and open in Photoshop, and then use the drawing tablet and paintbrush tool to recolour it by hand, making it look as much like coloured pencil as possible.  Here is the first 'clue' to the Mystery Drawing.  Feel free to comment...can you guess what the drawing will look like?

You can catch me working on this artwork at my You Tube channel.

Regards,

Monday, August 8, 2011

It's Alive!


I just HAD to share this animation with you.  It is a beautifully animated drawing, which grows little by little each second.  Made by an artist known as Sandra, from Estonia.

Imagine how many hours of work this took.  If you look carefully, the artist has even made sure that the petals on each flower grow out at exactly the same time. 

I think this is drawn by hand on paper, in simple black and white...so effective.  The flowers have a sort of retro look to them which I thought was interesting. 

At the time of this post, the video only had 104 views, and had only been uploaded four days ago on YouTube.  I think it deserves more attention, so that is another reason I am showing you.  If you like it, why don't you share it too?  

Regards,
MM.

Saturday, August 6, 2011

In The Depths of the Earth - Underground Rock Pattern Drawing Tutorial


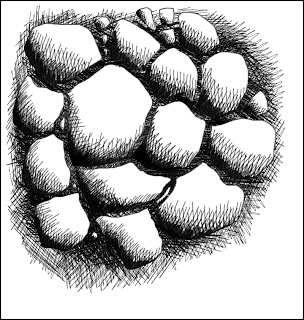
An enlarged section of 'Illuminated M' - Ink drawing.
Natural patterns can really add beauty to a design.  Organic shapes and textures bring your artwork to life, because they are not predictable.  A pattern which I use often in my own work is rocks, which can be used in many ways.  For example, an underground 'cut earth' look, or an old stone wall. 
On the left is an enlarged portion of an ink drawing I recently finished. If you want, you can read more about it here.  I have used the rock pattern to add a bit of interesting texture.

THE BASIC PATTERN

It is easy to draw your own rock pattern, if you follow these simple steps.


STEP ONE
Draw a general oval shape, but make sure you add a few flat sides.  You can make it as sharp or as smooth as you want, depending on what sort of rocks you want.


STEP TWO
Choose one of the flat sides of the first rock, and draw the next rock close against it.
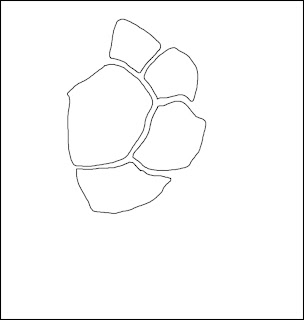


 STEP THREE
 Continue to draw a few rocks in the same way.  Make sure you vary the shape and size of each rock...


 ...until you have an interesting pattern.


SHADING THE ROCKS
STEP FOUR
Now that we have the basic pattern done, we can begin to add the shading.  This is what makes the rocks look 3-Dimensional.

Choose a rock, and draw some lines on one side of it.  This is sometimes known as 'hatching'.  Try and follow the shape of the rock.


 STEP FIVE
Draw some more hatching lines in the same place, but change your direction slightly.  Do this a few times until you think it looks good...
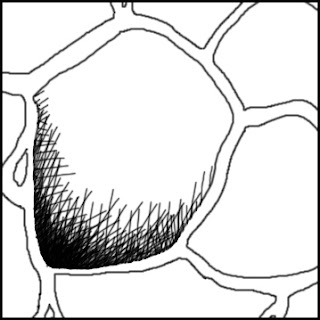


 ... and don't be afraid to draw really dark close to the edge...now it's really beginning to look like a 3D rock!


STEP SIX
Now you're an expert!  Go ahead and shade all the rocks, making sure that your shading is on the same side on every one.  
Click on image above to enlarge.
DRAWING THE EARTH

Each rock will be surrounded by earth, so now we need to add a bit of cross-hatching in between.  The rocks need to look as though they are sitting on something, instead of just floating in mid-air.

Just like we did with the rock surface,  hatch in one direction, then in the other. Remember, it is dirt, so you can be as messy as you like with this bit!  Hatch in many different directions to show lots of texture.


Give your drawing a once-over with a bit more darkness, especially in the areas closer to the rocks.  This adds a bit more depth to your drawing, and helps make the rocks look more three-dimensional.
Add a few wiggly cracks here and there to make your rocks look authentic.  They have been underground for thousands of years, after all!


You are now ready to use your new rock drawing skills to create a bit of fancy artwork!  Add tree roots, fossils, insects, or even ant tunnels.  Experiment with pencil, pen, paint, colour.....have fun!
'Illuminated M', by Miraculous Mosquito, which features the rock pattern technique.  Go here to read more about it.  Go here to purchase a print of this artwork.
If you enjoyed this tutorial, don't forget to comment, share and subscribe.  More coming soon!

Did you use this tutorial in your artwork?  Please show me, I would love to see it:)
Have a suggestion for a drawing tutorial?  Let me know in the comments below.

Regards,
MM.


Monday, August 1, 2011

Miraculous Mosquito's photostream

'That'll Be One Dollar, Please.'Anyone Ear That?Flora with Attitude.Moroccan Teapot.Coffee Plunger.Scribbler Quilt Idea
Heart Treevase of flowers Ink DrawingTree Drawn in 'Scribbler Too'Fancy Teacup DrawingLandscape Collage Experiment - Work In Progress.Spider Flower Drawing in Black and White
Tree with Soft BackgroundTree with Scribble BackgroundThree Trees on a Hill'Earthed' - Work in Progress.I Love No Leafless Land.illuminated letter M
Strawberry Calendar 2011Heart Wrapper and Topper for CupcakesTeapot TopperTeapot Wrapper and Topper for CupcakesMy Happy Flower Colouring Book Front CoverThree Trees Card
You can check out more of my artwork at my Flickr account:)
Regards, MM.
PS: (Don't forget to SUBSCRIBE :)) 

Sunday, July 31, 2011

'Would You Take a Dollar For That?'

Latest drawing journal entry.  Ink on paper.  Painted in Photoshop.
Click on image to enlarge.
It's amazing what you can find at a garage sale...especially a 'monster' one.  One person's trash is another person's treasure, as they say!
I thought this little one dollar bargain I picked up for my daughter would make a good subject for my drawing journal today.  Hope you like it :)

...oh, and don't forget to share and subscribe if you haven't already!  I appreciate it.  Thanks.

Regards,
MM
Related Posts Plugin for WordPress, Blogger...