 |
| An enlarged section of 'Illuminated M' - Ink drawing. |
Natural patterns can really add beauty to a design. Organic shapes and textures bring your artwork to life, because they are not predictable. A pattern which I use often in my own work is rocks, which can be used in many ways. For example, an underground 'cut earth' look, or an old stone wall.
On the left is an enlarged portion of an ink drawing I recently finished. If you want, you can read more about it here. I have used the rock pattern to add a bit of interesting texture.
THE BASIC PATTERN
It is easy to draw your own rock pattern, if you follow these simple steps.
STEP ONE
Draw a general oval shape, but make sure you
add a few flat sides. You can make it as sharp or as smooth as you want, depending on what sort of rocks you want.
STEP TWO
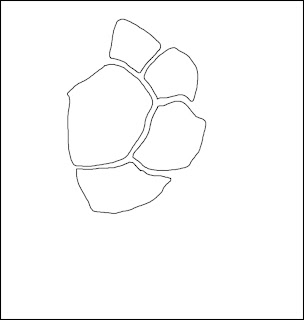
Choose one of the flat sides of the first rock, and draw the next rock close against it.
STEP THREE
Continue to draw a few rocks in the same way. Make sure you
vary the shape and size of each rock...
...until you have an interesting pattern.
STEP FOUR
Now that we have the basic pattern done, we can begin to add the
shading. This is what makes the rocks look
3-Dimensional.
Choose a rock, and draw some lines on one side of it. This is sometimes known as
'hatching'. Try and follow the shape of the rock.
STEP FIVE
Draw some more hatching lines in the same place, but change your direction slightly. Do this a few times until you think it looks good...
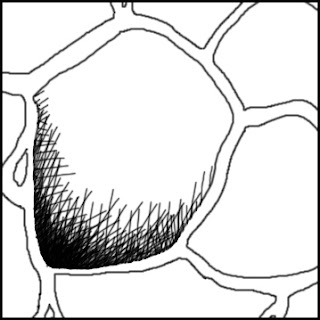
... and don't be afraid to draw really dark close to the edge...now it's really beginning to look like a 3D rock!
STEP SIXNow you're an expert! Go ahead and shade all the rocks, making sure that your shading is on the same side on every one.
 |
| Click on image above to enlarge. |
DRAWING THE EARTH
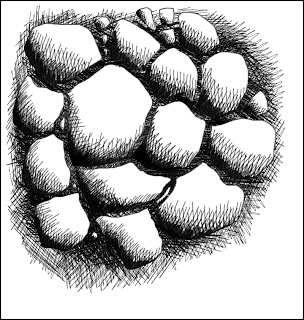
Each rock will be surrounded by earth, so now we need to add a bit of
cross-hatching in between. The rocks need to look as though they are sitting on something, instead of just floating in mid-air.
Just like we did with the rock surface, hatch in one direction, then in the other. Remember, it is dirt, so you can be as messy as you like with this bit! Hatch in many different directions to show lots of texture.
Give your drawing a once-over with a bit more darkness,
especially in the areas closer to the rocks. This adds a bit more depth to your drawing, and helps make the rocks look more three-dimensional.

Add a few wiggly
cracks here and there to make your rocks look authentic. They have been underground for thousands of years, after all!
You are now ready to use your new rock drawing skills to create a bit of fancy artwork! Add tree roots, fossils, insects, or even ant tunnels. Experiment with pencil, pen, paint, colour.....
have fun!
 |
| 'Illuminated M', by Miraculous Mosquito, which features the rock pattern technique. Go here to read more about it. Go here to purchase a print of this artwork. |
If you enjoyed this tutorial, don't forget to comment, share and subscribe. More coming soon!
Did you use this tutorial in your artwork? Please show me, I would love to see it:)
Have a suggestion for a drawing tutorial? Let me know in the comments below.
Regards,MM.


