Friday, September 6, 2013

Experimenting With Markers and Calico.


Sometimes I just grab whatever I can find and start drawing, especially if I am feeling stressed, or need to clear my mind.  If I think too much about it, I will end up doing nothing, so I just begin quickly.  This time I found a bit of cut up calico (natural unbleached cotton) and some permanent markers.  This is what I ended up with.  I now have quite of a collection of these random drawings on calico, which I keep in a display folder.  I'm not sure what I will do with them but I am 'saving them for a rainy day' as they say...and knowing the weather in Wellington, where I live, I shouldn't have to wait that long! Maybe you have some ideas for what I should do with them?  I would love to know...tell me in the comments below :)


Thursday, August 22, 2013

Braided Tree


I just wanted to show you this amazing tree we found in the grounds of our local hospital.  I couldn't pass without taking some photos.  Isn't is wonderful?  It looks as though it has been loosely plaited/braided over a very long period of time.  It has real character, don't you think?  I noticed a sign on it saying that it was protected by the local council, and no one was allowed to chop it down, which is nice.  Above is a photo of the tree with my son standing at the base, to show how big it is. You can see more of the beautiful texture and details in the close-up below.  I love the colour of it, too...sort of reminds me of old grey stone.  I think it must be very old.  I'm glad I caught a photo of it, I hope to draw it one day when I have a spare moment.


You're All So Awesome!


Recently my daughter was in hospital for 5 days with a severe, rather scary asthma attack.  At one stage I heard the doctor say to a nurse 'Tell intensive care to get ready just in case we need to send her there'.  You can imagine how my heart began pounding when I head that.  Asthma is something that many people, especially children, suffer from in New Zealand, which has one of the highest asthma rates in the world.  I have three children, and all of them have asthma, so we tend to dread winter, as either one or all of our children end up in the emergency department at one stage or another, sometimes more than once. Our neighbours must really wonder what is going on at our house, when once a week the ambulance turns up in the middle of the night!  The ambulance paramedics know us all very well now!

 AlhamduliAllah (Thank God) my daughter is much better now, and enjoying the warmer weather and better health.  Here is a photo of her in her favourite 'Hello Kitty' pyjamas, fighting the boredom of being stuck in bed, playing games and drawing on the tablet.  While she was in hospital, I posted a rainbow drawing she made when she began to feel better, on my Facebook page. Many of my lovely viewers/readers/fellow bloggers saw it and responded with such lovely comments of support. I just wanted to say thank you from us for thinking of us, and your uplifting comments.  Being in the children's ward for 5 days makes you feel very 'cut off' from the rest of the world, and it was nice to know I could still connect with everyone through the internet.

I also posted some of the beautiful murals that line the walls of the children's ward in the hospital.  You can view those here.

Once again, thanks to you all, we really appreciate it.


Now's Your Chance!


As if my printables were not enough of a bargain (most are only $1.50 USD each), 
now you can get one for free!  
To choose yours, jump over here.
Happy printing!

Sunday, August 4, 2013

Making the Most of Things


Being stuck in the hospital with my sick daughter may not be such a bad thing after all...at least I have internet connection here, which means I can show you this amazing mural which greets us every time we visit the children's ward. I have been meaning to show it to you for a while as I know you are the sort of people who will appreciate the work that must have gone into it. It was painted by a group of artists whose names are shown in the last photo. The mural covers the whole hallway around the ward and it is quite long. I will try to post more photos as the days go by.    Regards, MM.


Wednesday, July 24, 2013

How To Use Line Thickness to Create the Illusion of Distance.


HANDY DRAWING TRICK:

Varying your line width can create the illusion of distance.

You can show that something is far away (a small tree in the distance, for example) if you use a very thin nib size. For objects that are closer, use a thicker nib size.

You can see this in the drawing on the left, which has been displayed in steps to make things simple.

Following the tutorial below, try drawing it yourself, using the different pens you have in your collection. Begin with black pen, and then experiment with different colours.

You can also try this technique with different sized paintbrushes, charcoal pencil, pastels, etc.  Shades of colour can also be used to create distance (or depth) but I will show you that in another tutorial.  Happy drawing!


STEP 1
Draw a simple border.

STEP 2
Draw some objects in the foreground using a fairly
thick line.  I began with the sunflower on the left,
then worked my way over to the shell
object on the right. Overlapping objects
also helps to show which are closer
and which are further away.

STEP 3
I have now added some low hills and trees in the distance,
using thinner line of about half the width of the
line you used in step 2.
Can you see how the flowers at the front are
drawn with thick lines, and the hills are drawn with
thinner lines? It automatically makes the hills look
further away...tricky!


STEP 4
Now draw something even further away, such as the
steep mountains in this picture.  I have chosen a black pen with an
even thinner nib for this one.  The lines are fading off into the distance
quite nicely now.

STEP 5
Now for some puffy clouds to complete the landscape.
They are behind the steep mountains, so I will draw them with the thinnest
line yet.  If you look closely, you can even see that I have
not completed the lines on the clouds, but used some small
dots instead.  These clouds are so far away,
they are becoming invisible!

STEP 6
Step back and admire your drawing
with a happy sigh.
  Well done...you've finished!


How did your drawing turn out?  Did you draw the same, or something different?  Share your drawing in our 'Dangerous Doodle' Flickr group.
Did you like this tutorial? Rate and comment below.  If you think others might enjoy learning this drawing trick, you are welcome to share it with them.

Tuesday, July 23, 2013

Softies With a Difference


I have been making odds and ends out of calico (natural unbleached cotton) lately. I had many offcuts left over from various other projects which I had saved in a big box.  Not wanting them to go to waste, I came up with some strange soft-sculpture type objects.  


Click to enlarge.
These are not the sort of stuffed pillows you might rest your head on at night and have sweet dreams, I expect some of them might have the opposite effect.  So I have put them on a shelf in my online shop in case anyone as weird as me wants to buy them.  I'm sure there is someone on whose wall they would look fantastic.  I am not sure if they would match anyone's décor, though, but I guess you never know.  They were heaps of fun to make.  I think I will make some more...maybe a whole set.

Regards,  


Drawing With Gloves On

It has been pretty cold here in Wellington, New Zealand, this winter. We had a huge storm that uprooted many trees and did a lot of damage.  A couple of years ago, it snowed, which was not something that normally happens here.


I think this photo demonstrates how cold it has been. This is me working on my drawing tablet.  Those are gloves by the way, there is no moss growing on my hands hehe.

Hope it's nice and warm where you are! Regards,

Moleskine Malarky

The completed Moleskine cover...before the disaster!

If you follow me on Facebook, you may remember a Moleskine Journal cover that I was decorating a while ago. I posted some photos of the progress. I was so happy with the finished piece, and was all ready to offer it for sale on my online shop, but as things went, it wasn't meant to happen. I left it in what I thought was a safe place. However, someone else also thought it would be a good place to put a spray bottle full of water, which decided to tip over somehow and leak water all over the Moleskine.


Oh dear...spray bottles and Moleskines do not mix.
Those pages are completely warped!


So now there is a lovely big watermark right through the middle of the journal. All was not lost, though. The good thing was that the water didn't really touch the outside of the journal. So I scanned the drawing and decided to play around with it a bit digitally. Here you can see I have experimented with a series of panels. I was happy with this until I resized the image and made it smaller, and then realised it looks as if the viewer is looking at the scene through a set of prison bars. Not the uplifting, relaxing effect I was going for. Back to the drawing board!

The cover design, digitally salvaged.  I was playing around with
using panels to divide the composition, but I think this could remind
people of  the idea of looking out of a prison cell window, with those
three 'bars' .  Back to the Photoshop drawing board!

A Great Resource for Educators

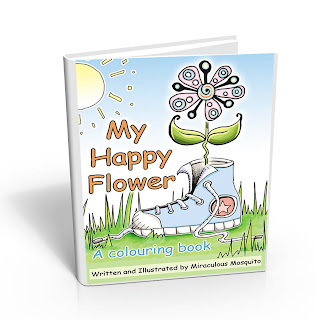
'My Happy Flower' Printable Colouring and Activity Book.

Click the image to see the different pages
in 'My Happy Flower' Colouring
and Activity Book.
How does a little flower end up growing in a shoe, and more importantly...whose shoe is it?

I am now selling my Happy Flower 17 page printable colouring and activity book in my online shop for a mere $6.

Designed by a former teacher with 10 years of experience, and a current homeschooler with 7 years of experience.  This is great resource for anyone interested in making learning fun and enjoyable for children of a variety of ages.  This book and the ideas below can be adapted for children of any age between preschool and middle school.

After purchase, the printable will automatically be sent as a zip file to your email address.  

Buy Now  $6 USD

How To Use This Book - Ideas for Teachers and Parents:

  • Discuss with children what they do when they see a pretty flower growing from a plant or tree.  Do they pick it, or leave it where it is? 
  • What happens to the flower when you take it off the plant? Discuss the reasons why a flower dies when it is separated from the plant.
  • What about other objects in nature, such as shells on the beach, a nest in a tree, or old logs on the floor of the forest...should we pick them up, or leave them where they are?  What sort of animals might live in them, and how would they feel if we disturbed them?  How about an empty shell on the beach...does anyone need it, or can you take it home?
  • Has anything ever used your shoe or gumboot as its home?  Tell the story.
  • Story starters:  'The small creature saw the shoe lying there.  It looked so nice and warm inside...'  or 'One stormy day, the wind, it blew. I heard a loud noise, and...'  or 'When my shoe went walkabout'.
  • Draw large flower shapes onto concrete with chalk, large paper with a marker, or on a whiteboard, and let the children fill them in with beautiful patterns and colours.
  • Make a windmill 'flower' out of paper, and blow it like the wind, or take it outside and let the real wind turn it around!
  • Make a collection of flower shapes from any materials, and use them to practice maths concepts (eg: counting, equations etc)
  • Print pages 3 to 10 of the colouring book (the story part) and laminate them.  Play a variety of games where children have to put the story in order.  Then discuss the process of growth in nature, and how the elements of earth, wind, water, and sunlight are needed to help things grow.  How are humans similar to flowers?  Do we need some of the same things that flowers need to survive?
  • Print out the front page, cut out the shoe (without the flower), glue it onto the bottom of a white A4 page  and photocopy so that each child has a copy.  Ask the students to make their own version of the flower in the shoe.  Use drawing, painting, collage, coloured paper, or the art materials of your choice.
  • Ask the children to make a family flower portrait.  Draw family members (or people they live with) as different types of flowers.  Before this activity it could be useful to look at different types of flowers in books and in the garden, so that they have some knowledge of the different shapes and colours of flora they can use in their artwork.
  • Go on an excursion to the local Botanical Gardens, or ask one of the parents if they have a flowering garden to visit.  Spend the day drawing flowers and leaves, and looking at the flora up close.  Learn some of the scientific names of the flowering plants.
  • Learn about the flowers that can be used as natural medicine.
  • Grow some different flowers on a windowsill at home or in the classroom.  Use seeds from the garden store, or use heirloom seeds.
  • Make an edible flower salad, using flowers such as nasturtiums.
  • Have a competition to see who can hop on one foot for the longest amount of time.
  • Hop on one foot and sing the following song:  (to the tune of 'Pop Goes the Weasel').  Use the words of the song for phonics, reading, and spelling activities which match the level of the children.
THE HOPPING SONG
(Verse 1)
Hopping to the grocery store
Milk,eggs, and butter
Up and down and up and down
Hop onto the other (hop onto the other foot on the word 'hop')

(Verse 2)
Hopping to the bakery,
Bread and cakes and bagels
Up and down and up and down
Put them on the table. (Jump on to two feet on the word 'put' and pretend to put bread on a table on the word 'table')

(Go back to the first verse and begin hopping again)

I hope you have found this resource helpful.  I would love to hear how you use it with your class, or with your own children.  Perhaps you would like me to create some additional resources to match this one? Let me know in the comments below.  Please share with your friends.

Regards,


Monday, July 22, 2013

Farewell, Felix.


Some of you may have seen this photo I posted a while ago on Facebook, showing my cat, Felix, making himself at home on my desk. Poor Felix recently came to the end of his life, I'm afraid, and he is now buried in our back yard under a pretty rose bush.  He was a lovely cat...he was over 10 years old, and had been with me before I was even married.  I brought him all the way from my home in Australia over here to New Zealand.  He was always purring, and purred loudly almost to the end.  I hope he is somewhere nice sneaking up on birds, and purring to his heart's content.

Regards,


3D Paintbrush Experiment

This was a little something I tried (and failed) but had fun making.  It was meant to end up like a sort of 3D, stuffed paintbrush made from natural cotton.  I used permanent markers to draw the brush.  It actually turned out quite ok, but then I thought that spraying on fixative to really set the colours would be a good idea. Of course the alcohol in the fixative spray made the colours spread out all over the place...an effect I wasn't expecting.  It could be an interesting project to explore in the future, though. I've always been a fan of soft sculpture since my art teacher introduced it to me at high school!  We did a unit on the Pop Art movement, and I remember our assignment was to make something hard into something soft, or vice versa.

The paintbrush drawn with permanent markers on calico fabric.

I made a copy of the shape in calico, put right sides together,
and sewed around the edges with the sewing machine, leaving a small gap.
I turned it right side out, and then hand stitched the gap closed.

After it was all sewed together, I used my sewing machine to
go over some of the lines on the 'metal' part of the paintbrush.
I also sewed around the outline of the shape, which gave it
more of a puffy look, rather than fully 3-dimensional.

This is the backside of the paintbrush.  You can see the blueish
colour has spread through to the back after I tried to 'fix' the colour
with fixative spray (click on image to enlarge).  Oh well...we learn by our mistakes!

regards,

Sunday, July 21, 2013

Garden Gone Wild


Last night I had the drawing bug, and decided to do a bit of an experimental livestream on YouTube, using Google Hangout.  During the livestream I drew this piece using black ink on white paper.  Thanks for joining in the fun if you were watching.  It was a bit of a test, I have never used hangout before.  I learnt a few tricks and next time I think I will schedule it so that more people can watch.  I posted it on Facebook and Twitter, so make sure you friend me there so you don't miss out next time.  I have also included a simple video tutorial showing how to draw something a little similar, in my coming newsletter, so don't forget to sign up.  

By the way, if you want to watch the livestream where I draw this, you can see it here.  It is quite long and unedited, so you might want to fast forward through some parts.

Regards,


Just Felt Like Doodlin'

Thursday, July 18, 2013

Help Kick-Start a Fellow Artist's New Project.

This is Just a short post to help a fellow YouTuber reach his Kick Starter goal.  Shoo Rayner is a very hard-working artist who has posted over 800 videos on YouTube, mostly drawing tutorials.  His videos are fun, and very helpful if you are learning to draw. I have learnt countless tricks and tips from watching them. If you were to pay someone to teach you to draw, and to give you art career advice,  it would cost you a fortune, but you can learn from his years of experience, for free!  I think that's pretty good.

So I am writing this post to ask you to support his new artistic project (which sounds amazing, by the way) on kick-starter.  If he doesn't reach the goal, he won't get any of the donated amount so far, which would be a real shame. He only has 28 days left to reach it.  If you haven't seen his videos, go and take a look, you won't be disappointed.  If you have already seen them and enjoyed or learnt something from them, go ahead and donate a little something.  If you donate, you can also choose one of the many rewards Shoo has offered on the kick-starter page.

Shoo explains everything in the video below.  Or you can go straight to his Kickstarter campaign.


Regards,


Monday, July 15, 2013

'The Swamp' - Coming Soon. Suggestions?

The very first edition of 'The Swamp' will be coming out very soon. It will be an email newsletter full of all things Miraculous Mosquito, and will include news, tutorials, handy hints, and freebies. It will include special stuff exclusively for newsletter subscribers.

I want anyone who subscribes for the newsletter to be excited when it arrives, so I need your suggestions.  What sort of things do you want me to include?  Now is your chance to let me know before issue #1 is sent out across the globe.  Comment under this post, contact me, or comment on my Facebook page under this article.  Want to sign up to receive 'The Swamp'? Great! Click here.

Regards,

Friday, March 1, 2013

Please Vote for Miraculous Mosquito!


Please vote for my fabric design in the 'Lion-Lamb' Spoonflower contest! 
To vote, look for 'Vote in This Week's Contest' at this link.  Thanks!

Regards,

Related Posts Plugin for WordPress, Blogger...