The letter 'G'! Part of my 'Fun with Typography' series of quick drawing videos. The letter G video is below, and don't forget to check out all the other letters on my YouTube Channel. Subscribe to my YT channel and blog to make sure you don't miss out on any.
I'm making some progress with my fancy lettering videos. As you can see, they are not meant to be perfectly polished lettering, just a fun design with a few quick curls and frilly bits.
I was going for the hand-drawn look. Although I love using the computer to draw and add colour, it can sometimes turn out a bit mass-produced and cold looking. If you start with one of your own drawings on paper, scan it, and then use the computer to colour it, you can still keep that handmade look whilst enjoying the convenience of not having to get all your paints out and then clean up the mess afterwards (although I do love to get my watercolours out every now and again).
This is meant to be the sort of lettering that anyone could do fairly quickly, on a card or a poster for example. In the videos below you will be able to see that I have just drawn a very basic outline of each letter, and then added four elements which tie them all together:
1. A few curls here and there (no rules...just ad-lib and have some fun with it)
2. Some quick frills on the left hand side.
3. Some diagonal hatching , again on the left side (just repeated single lines, quick and easy).
4. A double-lined border, rather roughly drawn. Who needs rulers, anyway?!
If you would prefer to see a really fancy, much neater 'Illuminated Letter', you can always look at this one (there is a link to the video there too, if you want to watch me draw it).
Anyway, below are the 'Fun with Typography' videos that I have made so far, all in one convenient place. They are all very short and sweet. I hope you have a go at drawing some groovy fonts of your own, it really is fun. By the way, a small trick...start by drawing the basic letter shape first (like a thin stick) and then draw a thicker outline around that, as if you were drawing a plank of wood, or a letter made out of a balloon. Hey...why don't you just make your letters look like balloons? Now there's an idea!
Here's a bit of Jungly fun for you! Create a tangled jungle pattern with this new Dangerous Doodle tutorial called 'Deep in the Jungle'. I have made it pretty simple for everyone to follow, but you are welcome to get complicated and tangle those vines as much as your heart desires.
Click on the video below. Looking forward to your comments. Enjoy!
Regards,
P.S: (You are welcome to use the 'Dangerous Doodle' pattern designs in any of your own creations, as I have provided them for free, however I would really appreciate it if you have the chance to link back to my articles so that others could share the doodly fun! Thanks :))
Ta-daaaah! A new 'Dangerous Doodle' pattern tutorial. I am really enjoying making these. Can't wait to see what you think of this one. If you use it in your drawing, I would love to see it. Send me a link to your blog or just send me a pikkie.
I'm thinking of running some sort of competition where people submit drawings they have done using some of my patterns. It's in my head at the moment, but I will post a competition soon, so don't forget to subscribe so you don't miss out on any news!
Happy doodling!
Regards,
P.S: (You are welcome to use the 'Dangerous Doodle' pattern designs in any of your own creations, as I have provided them for free, however I would really appreciate it if you have the chance to link back to my articles so that others could share the doodly fun! Thanks :))
Building up layers is a great way to give perspective to your artwork. Make the top layers bigger than the bottom ones, and voila! You have instant perspective...because we all know that things look smaller as they get further away.
My 5 year old daughter and 3 year old son were mesmerised by the idea that things look smaller far away but are really the same size as the same object close up. I guess it is something we understand but take for granted as grown ups.
Anyway, here is a Dangerous Doodle tutorial for you called 'Over and Under'. I have made it fairly simple, but you could easily embellish this with more shading, colours, and patterns to make it your own. The sky is the limit!
Join the Dangerous Doodles Flickr Group.
How can this be a dangerous doodle, I hear you ask? Well just be careful not to get caught up in those vines or fall through the spaces as you draw...doodling can be a risky business, you know!
I can't wait to see what you come up with! Don't forget to subscribe so you don't miss the next tutorial, and please share this article with all your doodler friends :)
Send me your doodles at miraculousmosquito (at) gmail (dot) com.
Have fun!
Regards,
P.S: (You are welcome to use the 'Dangerous Doodle' pattern designs in any of your own creations, as I have provided them for free, however I would really appreciate it if you have the chance to link back to my articles so that others could share the doodly fun! Thanks :))
Well to be exact, these doodles are not exactly dangerous, but we all love a bit of alliteration now and again, don't we? I had to think of something dramatic to get your attention!
This first video might not be dangerous, but don't eat too much before you watch it...there are a lot of wavy lines. Hence the name 'Sea Sick'.
Some of my YouTube subscribers have commented that my drawing videos are a tad too fast for them to follow, so I have come up with a series of pattern drawing tutorial videos which are a bit more simple and straight to the point. That way people can use the designs to adapt to their own artwork, and whatever shapes they want to fill.
I have named them my 'Dangerous Doodles' Pattern tutorial series, and I hope you like them. Let me know what you think in the comments below this post, or under the video itself on YouTube.
If you would like to have a go at drawing these patterns yourself, don't forget to use the pause button if you want more time to think about each line and shape before you put it down on paper. Don't get too caught up in trying to make your drawing look exactly like mine. The idea is that you express the lines and shapes in your own way. After all, we all think differently and hold our pens differently, so no two drawings are ever going to turn out the same...that's what makes art so interesting! Just relax, go with the flow, and overall make sure that you enjoy what you are doing.
Use different colours and materials. You don't have to stick with ink. Try a thin paintbrush with some different coloured inks, coloured pencils, aquarelles (water colour pencils), or whatever takes your fancy.
Made a mistake? Fantastic! There is no such thing as a mistake in this sort of drawing, in fact mistakes are a great way to come up with a new pattern or idea for another artwork. Just draw around or over it and turn it into a masterpiece. After all, no one will ever know that it was a mistake except you....shhh!
I have so many more ideas for these tutorials, and have already recorded about eight of them so far, I just have to edit them, and hey presto! So make sure you subscribe to my blog and youtube channel so you don't miss a thing.
If you use any of the patterns in your artwork, I would love to see it, and maybe post it on this blog to inspire others. You can send it to me at miraculousmosquito (at) gmail (dot) com.
Have a great day (or night, depending on where you are on the Earth!)
Regards,
P.S: (You are welcome to use the 'Dangerous Doodle' pattern designs in any of your own creations, as I have provided them for free, however I would really appreciate it if you have the chance to link back to my articles so that others could share the doodly fun! Thanks :))
Another flower design finished off at...oh dear, it's two in the morning! The only time of the day I get any complete peace and quiet hehe. Oh well I better get this posted before my eyes drop out of my head.
I drew this one in black marker pen on paper, scanned it in, and then coloured it in Photoshop. I could have used the magic wand tool and the paintbucket to colour it, but I like to do things the hard, old fashioned way...I used my graphics tablet to colour each leaf, petal, vine, etc. It's quite relaxing, though, to do it that way.
The original drawing is the black outline one to the left.
First colour version.
Changed to black and white and inverted.
The image to the right is the design after being hand coloured in photoshop using a graphics tablet. I deliberately made the colours very loud. Below you can see a few more colour combination ideas, where I have fiddled around with things a bit.
A bit easier on the eyes, this one. I quite like it.
Pretty pink version.
White outline on grey background.
So which version do you prefer? Write a comment and let me know :)
Bye for now
MM
ps: (One of my You Tube channel subscribers made a comment on one of my drawing videos, suggesting that I design some stamps (thanks, Scraplynn!). This is an idea I thought about before, and I would love to do it but I woudn't know how to start. I wonder where I would get them made...suggestions, anyone?)
Sometimes I have such a craving for sushi, I just have to make it. It is too expensive to have it at a restaurant, so I decided it was time to try my hand at making it myself. Hooray for YouTube...I have learnt how to cook so many things from watching videos! And I should also mention my good Japanese friend who is a great cook, and showed me the finer points and some cool ingredient ideas (Thanks, Mutsumi! :D)
Well my first attempt was pretty pathetic...let's just say when my family ate it, more rice ended up in their laps than in their mouths. However, I didn't give up. I have practiced since then, and thankfully improved in my sushi rolling skills so that the rice stays inside :D
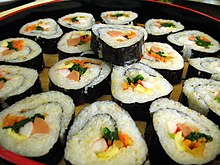
South Korean 'Kimbap'
I used to work as a teacher in South Korea. There they call it 'Kimbap': 'Kim' means seaweed and 'bap' means steamed rice. It is a pretty popular dish there, with even a hit pop song being made about it. When I went for picnics and outings with my kindergarten students, the kind parents of the students would always make us delicious Korean food, and Kimbap was always there. The parents would also make a mini bite sized version of it for their children which was so cute. When I was running late and hadn't had time to make my lunch, I would quickly pop in to the kimbap shop down the street and grab a chonon (about 1 dollar's worth) kimbap roll, usually tuna and mayo flavour. I was always impressed watching the Korean ladies as they expertly made it each morning. They Probably wondered who the crazy foreigner was staring in at the shop window. I don't think it was such a fun job for them, I bet they didn't get paid much.
Korean Kimbap usually has one special ingredient: 'Kimchi' - spicy fermented cabbage. When I first arrived in Korea it was not my favourite ingredient, but as time went on I developed a bit of a taste for it. I mean, every restaurant I went to usually had it as a side dish, and the school I worked at always served it for lunch with steamed rice, so it was impossible to avoid it. Now I sort of look at it with fond memories in the asian food shop and think about good ol' South Korea :)
So anyway, the point of this little ramble is that my Korean Kimbap adventures were the inspiration for the drawing. You can see the sped up version of the actual drawing on my You Tube Channel. I might do a bit more work on this one and make it a print in my available in my shop. Let me know if you are interested in purchasing one, or if you have any other suggestions for this sketch.
Sushi Cake
Oh, and if you now feel like having a go at making Korean Kimbap youself, check out this video by Aeri, from 'Aeri's kitchen'. She makes some really good cooking lessons. For something a little bit different, try this Sushi Cake from 'runnyrunny999's' channel. I have yet to try this recipe but I want to one day, it looks so pretty with the pink rice!
So what about you? Do you like sushi or kimbap? If so, what is your favourite flavour ? Feel free to comment :)
This is the latest of my drawings for my YouTube channel. I have only just found the time (or the free hands) to type about it, that is why I posted the video all by itself first...its difficult to type when I am feeding a baby...well it is possible but it would take me too long using only one hand :). My computer is now a Mac, which is really exciting but I feel like I am learning how to use a computer all over again and things seem to take forever. I just got used to windows movie maker for editing my drawing videos, even though it is so simple and sort of old fashioned, I could punch out a quick video frequently without having to really think too hard...now I am using Apple IMovie, and its a bit tricky to learn but Im getting the hang of it. It has some really cool transitions and other features (hence the cheesy ripple effect and funny sound effect at the start with the big pencil...I couldn't help myself :D)
Anyway I thought since people seemed to enjoy my 'Flowers are Fun' video (which was my first ever drawing video), I would do another version. I think I like this one better, with all the bits sprouting from the outside of the flower...or is it spaghetti? Who knows? But I really enjoyed drawing this one. This is a great activity for loosening up before you do another drawing. I would like to scan this one and do something else with it in the future, though. A commenter on YouTube suggested making a collection of these black and white drawings and making them into a colouring book for children. I think adults would also enjoy colouring these in as well.
Some people called this a 'Zentangle', which seems to be a growing drawing trend at the moment. I have no idea where this word came from, but I have always drawn these just for fun. You can call it that if you desperately want to hehe :)